Thursday, April 30, 2009

Striking Silhouettes

One of the hottest trends in stamp designs for 2009 has been the silhouette, a completely solid image much like a shadow. They're very versatile because you can stamp them in a solid colour to achieve a striking silhouette on a vibrant background, or you can play with stamping techniques (sponging and other direct-to-rubber techniques work well) to create an image with depth and dimension. This evening my friend Emily joined me for a quick class, making two projects, including a birthday card and matching gift box using two fantastic Silhouette sets. 
.
Supplies used for the card:
*  Real Red, Basic Black & Whisper White card stock
*  Basic Black and Real Red Classic Ink Pad
*  The Big Shot & the Top Note die
*  Upsy Daisy stamp set

Supplies for the mini gift box:
*  Real Red & Basic Black card stock
*  Basic Black Classic Ink Pad
*  Real Red grosgrain ribbon
*  The Big Shot & the Top Note die
*  Pocket Silhouettes stamp set
.
Are you interested in making this sweet, Asian-influenced card and gift set? Contact me today at summer.burton@sympatico.ca to arrange your own stamping session!
.

Tuesday, April 28, 2009

Feeling Flowery

Between the onset of spring and the fact mother's day is just around the corner, how can we all not feel a little "flowery"? Here's a great way to express that flowery feeling... send someone this sweet little flower pot, featuring a slide-out topper revealing a hidden message! 

To make the pot,  select a clay-pot-inspired colour like Only Orange, Pumkin Pie, or Tangerine Tango and cut it to 3 1/2" x 8 1/2". Score it at 2" and 5 1/4", then fold the 2" piece forward and the other (5 1/4") piece backward. Trim the 2" piece using the scallop edged punch. To create the angled bottom, line the fold at the top of the card up with the cutting edge of your paper trimmer and the bottom of the card with the 1/2" mark, then trim. Don't forget to keep your 2" scalloped edge folded up so you don't trim it as well! Use mini glue dots to adhere the top corners of the pot together; the scalloped edge of the pot can be secured with the ribbon you wrap around it as decoration. 

The inside "pull" is 4 1/2" x 2 1/2", with a Whisper White overlay that's 1/4" smaller. My flowers were created using the scalloped circle punch for the petals and the 3/4" circle punch for the centre of the flowers, but this card can be made using everything from the Big Shot flower dies to flowers from the Pretties or Flower Fusion Kits.  Just glue on whatever flowers strike your fancy! Tip: Be sure when gluing the flowers in place you hold the card over your envelope - that will ensure you don't go so "flower crazy" that your card won't fit in the envelope!
.
Big thanks go to Chris C. for sharing this awesome design idea at our recent Quarterly Stampin' Up meeting!
.

Wednesday, April 22, 2009

Quarterly Meeting - Ideas Galore!

The Quarterly Stampin' Up meeting on Monday was excellent as usual... big thanks go to Alicia and all the volunteers who make this event informative and fun for all of us who attend. I snapped several pictures of sample cards and demo projects, and have posted them to a web album - to check it out click on "Online Album: April Quarterly Meeting Samples" under Personal Links on the right hand side of the page. 
.

Coffee, Tea and Time For Me!

Are you ready for a sneak peek at a class coming up on my May/June class calendar? At our upcoming "Coffee, Tea and Time For Me" class we'll share a couple of hours using Stampin' Up punches and glass etching cream to decorate three coffee/tea/etc. storage containers similar to the coffee and espresso ones shown here:
.
.
After decorating our containers we'll continue the theme as we make a beautiful coffee-inspired card to give to a friend (what a great way to suggest a coffee date!) As an extra bonus, while we get crafty we'll be enjoying lattes and/or espresso from my own personal coffee bar... start planning now for whether you'd like a toffee-nut latte or perhaps a simple cafe au lait with a shot of sugar-free caramel syrup! Keep your eyes open for my upcoming class calendar, and RSVP to summer.burton@sympatico.ca if you want to ensure you get a spot in this caffeinated class! 
.

Sunday, April 19, 2009

Cock-a-Doodle-Doo!

I've been hard at work today on my swaps for tomorrow night's Demonstrator Quarterly meeting. Swaps are always an exciting part of our meetings - they're a great opportunity to share your creativity with other Demonstrators while learning from the amazing cards they create. For this meeting I'm swapping ten cards, and after browsing http://www.spitcoaststampers.com/ and several other crafting websites for some inspiring ideas, here is my finished result:
.
.
If you're interested in creating this card for yourself, you'll need the following ingredients:
  • Rustic Rooster Level 2 Hostess set
  • Pocket Silhouettes stamp set (for the verse)
  • Very Vanilla, Sahara Sand and Mellow Moss card stock
  • Sahara Sand, Mellow Moss, More Mustard, Close to Cocoa, and Ruby Red inks
  • StazOn Jet Black ink
  • Blender pens
  • Sponges
  • 3/4" circle punch
  • Snail Adhesive
  • Anywhere Glue stick
  • A lit candle
  • Wet paper towel
Note: I'm thinking of including this card in a class featured on my Summer Class Schedule, so do let me know if you might be interested in making this card as part of a class.
.
I'm always interested to see how a card design can be changed up in a simple way to be used for a completely different occasion, and with Father's Day coming up in June I thought hmmm... male rooster... proud papa... this might make a very cool Father's Day card! I switched out the "thanks so much" verse for a stamp from the Eight Great Greetings set (featured in our current Occasions mini), and voila!
.
.
I'll update Summer's Creative Corner with pictures from the Quarterly meeting so you can get a peek at what I swapped my roosters for!
.

Wednesday, April 15, 2009

Creative Organization: Right Around the Corner

I received a large Stampin' Up order yesterday, and with five more stamp sets needing to find a home in my Creative Corner it was a perfect time to utilize some of the organizational accessories my husband Chris installed for me this week.

.

.

I pour over craft and scrapbook magazines for new ideas and have always loved the different styles of inkpad "caddies" available (including the gorgeous Colour Caddy Stampin' Up offers), but as most of them are table-top spinning designs they don't really fit my limited space. While preparing for a spring yard sale I came across an old cassette tape holder in our basement and had a flash of inspiration... and was thrilled when I tried my inkpads out in the cubbies and they were a perfect fit! It's now mounted on the wall by my desk, and another re-imagined space saver hangs below it: two metal cutlery racks from Ikea. They're meant to be used with "S" hooks to hang flippers, stirring spoons and other kitchen gadgets - I have two of these fantastic things helping me avoid cutlery clutter in my kitchen right now. It turns out that when mounted they're also the perfect size to act as punch holders, making them easy to see and (happily) up out of the way on the wall. Mmmm organization... having my craft supplies easy to identify and pull out makes me want to get busy making something right now!

Friday, April 10, 2009

Versatile VersaMarkers

You may already be familiar with VersaMark, the clear ink that acts as a watermark to make tone-on-tone designs on card stock… but did you know it also comes in a marker? The dual-tipped VersaMarker offers both a bullet tip and brush tip for freehand drawing, giving you the freedom to decide how much or how little watermarking to bring to your project. Here are my Top 5 favourite techniques using the VersaMarker:

.

1. Brushed on to add weight to your already inked design

.
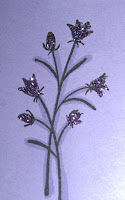
Here I’ve used Basic Black to stamp a simple floral design from the Pocket Silhouettes set onto Lavender Lace card stock, and then run the brush tip of the VersaMarker across some of the stems. To finish the look I’ve applied dashes of Fine Cosmo glitter to some of the buds.

.

2. Inking a small portion of a larger stamp for an accent piece

.
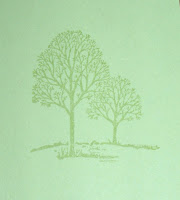
The two trees shown above are part of the largest stamp from the Lovely as a Tree set, which actually consists of several trees in a row. I’ve used the VersaMarker to ink up only my chosen part of the stamp (see photo below) so it fits perfectly on a piece of Certainly Celery scrap I’ve been saving. Once you start using only a part of your stamps, each one appears almost as an assembled puzzle, and you can’t help but see the different ways you could pull bits and pieces out of almost any stamp design.

.
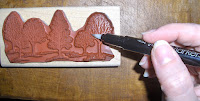
 .

3. Complete fine detail drawing on areas of your card you wish to emboss

.
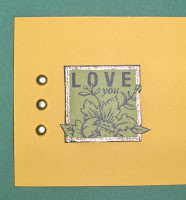
This stamp from the Dreams du Jour set has a lovely piped border at the edge and presents the perfect opportunity to use the VersaMarker to fill in fine detail areas for embossing. I “coloured” the edge of the stamped image, sprinkled it with gold embossing powder and tapped the excess off my card stock. VersaMark ink holds the embossing powder in place, and once the powder is melted with a Heat Tool this beautiful shiny border accents your stamping.

.

4. Create shadows under stamped objects to enhance the look of dimension

.
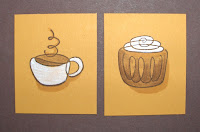
Here I’ve used VersaMarker to give a three-dimensional effect to the coffee cup and cupcake stamps from the Level 3 Hostess Set called Hand Drawn Bundle. On a background of More Mustard card stock, the cup and cupcake pop with Whisper White and Close to Cocoa inks applied with a blender pen. I’ve “grounded” each image with a hand-drawn VersaMarker shadow, which gives extra weight and dimension to my stamping.

.

5. Create a soft glowing look by brushing a VersaMarked image with Stampin’ Pastels

.
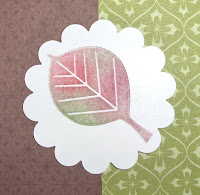
This technique uses the stickiness of the VersaMark ink as a platform for chalk pastels, and the result is a soft subtle effect that often seems to glow on your project. After inking up a leaf stamp from the Best Wishes and More set with VersaMark, I stamped my image on Whisper White card stock. Then using cotton balls I applied soft, sweeping strokes of colour to give the impression of a leaf caught in the transition from summertime green to the orange, red and brown of autumn.

.

If you're looking for a new tool to really add pizzazz to your projects, you just can't beat the VersaMarker, especially when you consider its low selling price of only $3.95. When you place your next order don't forget to add this versatile marker!

.